Semua tulisan dari anisibrahim71

seorang pengajar belajar menggambar sketsa wajah orang

You Can Caricature

You Can Caricature!                                  
by  rickzimmerman

If you’ve got the will and the desire, you can caricature! Follow along as these simple guidelines show you how you can develop your drawing talent to draw out celebrities and the famous!
First, you must observe and discern. You must study not only pictures and video of your likely caricature subject, but you must also discern the particular features, clothing, props, mannerisms and expressions that will give your eventual drawing life and identity. It is also very helpful to study the works of other caricaturists and cartoonists, to see what salient elements they glean from the celeb or historical figure.
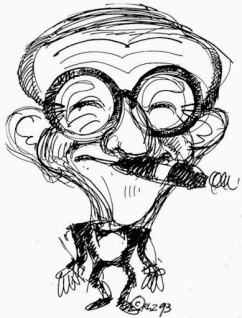
For example, in the image of Woody
Allen shown here, I quite consciously
chose not only his signature eyeglasses, but also a fairly typical blazer over turtleneck as his wardrobe. His posture suggests his often befuddled I-can’t- explain-life demeanor, as do the raised eyebrows and wrinkled brow. Though Woody did not always sport fly-away hair, it seems in keeping with the overall posture and expression. The eyes centered squarely on the viewer draw to mind Woody’s direct monologue style, and pull the viewer into the scene.


Tough guy! by rlz

Next, the caricature of Mike Tyson (early in his career) shows another key aspect of caricaturing. Since we most often recognize celebs and historical figures first by their facial features, head shape, and headgear, it is best to enlarge those, letting the body shrink to a lesser role in the eventual drawing. Though Mike Tyson has tremendous heft throughout his entire body, especially the upper torso, here the head dominates, and the facial features control the message of the drawing.
You will also notice that I have changed the style of drawing to suit the subject. I chose to depict Mike’s head as if hewn from a block of granite, to signify his strength and immutability. I also chose to keep the arms tucked into the body, and the boxing gloves very simple, to heighten the effect of unmoving Gibraltar, upon which other fighters will be dashed.

Goodbye, Yellow Brick Road! by rlz

To develop your caricaturing ability, you must also practice and experiment. Here you see an old sketch of Elton John (also rather early in his career). This is clearly a youthful Elton, back when he was prone to wearing truly outrageous stage
outfits, and had a clearly receding hairline. One can see his thin-faced exuberance and antic air. To caricature Elton today, I would have to thicken his face, add his wig, tone down the outfit and make him a bit more sober and reflective. But this sketch suited the period, and allowed me to try out different things with my
drawing.
Notice the quick scribbly character of the drawing — I was literally experimenting with lines, hoping to find the right ones that would capture the personality. In developing a caricature, I might generate 20 or 30 such sketches, before I find a bit of lip or eye or hairline that suits my target. I will then keep that feature and begin working on the rest.

What’s that, Gracie? by rlz

You will find in caricature that some figures are timeless and some are ever- changing chameleons. I could have drawn the above sketch of George Burns at almost any time in his career. Madonna I would have to draw week by week. For George’s sketch, the eyeglasses, cigar and crinkly puckered smile were essential. The tux seemed a natural choice, but in this sketch, you may notice that the arms and hands seem a bit lost and out of character, as if they don’t know what they should be doing. That’s probably because when we observed George performing, we almost never saw his arms or hands (except the one holding the cigar). As a result, I had no real model to go by, so this sketch remains unfinished. But, here too, as in the Elton sketch, you can see the experimentation at play in the drawing. Don’t ever stop experimenting; the perfect line awaits in the next sketch — or the next, or the next.

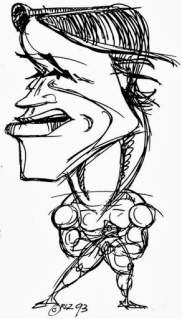
I’ll Be Back! by rlz

Here the perfect line happened to be a perfect jawline! For this sketch of Ahnold, the Governator, in the waning days of his weightlifting era and the introduction of Conan the Barbarian, I felt it best to dwell on his profile. There I could best capture his unique jaw, lips, facial musculature, and youthful flow of cowlicky hair. I then subdued the body into merely a swirling mass of muscleman posturing. One can
see that this would never work today as a sketch of a suited-up state executive —
it suits only its time. For a subject such as this, the caricaturist needs to practice
his or her skills over time, capturing the subject in a variety of settings and scenes, to zero in on the identifiable essence of the person.

The gang’s all here! by rlz

One can also develop caricatures in group settings (as political caricaturists often must). Here the work is somewhat easier, because the viewer’s recognition of your subjects is aided by the common theme. For example, these are all clearly musical performers, so it’s easier to recognize Diana Ross by association, if not by immediate identification. The fact that she’s surrounded by Rod Stewart and Phil Collins and Steve Wonder and Paula Abdul and Mick Jagger and Elton John indicate that this was the royalty of pop/rock/dance music circa the late 1980s. Working on such a scene let’s you hone your caricaturing skills as well as refine your ability to ‘stage’ your personalities, and swaddle them in the proper wardrobe and props.

See Dick Run. See Spiro Run. by rlz

Finally, let’s focus on the political cartoon. The very nature of political discourse today seems to make political caricaturing a blood sport. It seems impossible to satirize or mock one’s opponent TOO much. But one tends to forget things have always been this way. Some of the most vicious visual attacks on politicos in our nation’s history actually date back to the electoral contests of the 1800s and early
1900s. By way of political nostalgia, I share with you the sketch above, which I prepared as Richard Nixon was readying his resignation speech for the Watergate cover-up, not long after his Vice-President Spiro T. Agnew resigned due to
criminal offenses. It was a brutal (and perhaps tasteless) assault on their personalities, I suppose, but no worse than their assault on our nation’s laws and executive offices. Remember, that first, last and always the aim of your caricaturing
should be a sort of whimsical recognition, if not outright humor and satire.

potrait sketsa wajah sample

I have bought this course because I wanted to be able to draw realistic portraits and I felt
that I did not have the skills to produce a beautiful realistic portrait.
This course has been a great help, although I still need loads of practice I feel that I have
learned so much through following this course in techniques and observation.  The lessons
are so easy to follow especially with the aid of the process maps which show which steps
to tackle next. 
The reference photos are also a great help to those who need material to work from, I
myself preferred to use my own photos to work from as they are of more interest to me
personally.

I thought that this course would be benefit from a section on how to draw/trace the head
before you add the features. When I wrote to Christopher about this he answered promptly
and suggested ways of doing this and even sent me a video link to help me with this
process. 
I feel that my work has improved a great deal since I started this course and I still use it as
reference whenever I work on a new portrait. I would recommend this course to anyone who
wants to draw truly realistic portraits from photographs.

tips trik gradasi gambar sketsa photo

pada awalnya ketika saya belajar menggambar sangat sulit ,untuk menggambar manusia yang utuh hal yang paling susah adalah menggambar muka. untuk membuat mukan yang mirip manusia saja hehehe kaya apa gitu ! untuk goresan saja kadang kadang ga halus alis kasar banget, tapi ada satu trik latihan yang bisa menghaluskan goresan yaitu dengan cara membuat garis garis kaya anak tk yang lagi buat pagar pagaran seperti ini  ” ||||||||||||||||||||||||||||||||||||||||||||||||||||||||||||||||||||||||||||||||||||||||||| ” terus” ///////////////////////////////////////////////////////////”  kemudian “_________________________________________________________” dan sterusnya sampe pegal jari jari ini . nampaknya sepele ya ? tapi apa coba epeknya ? ga nyangka goresan goresan yang saya buat semakin halus, kalo agan ga percaya coba saja buktikan sendiri ! dan anehnya setiap lekukan lekukan yang saya buat juga semakin lemah gemulai hehehe , ga maksudnya makin lentur setiap menggambar bagian bagian yang berbentuk oval melinkar atau pun bundar, itu hanya dengan membuat garis garis yang sudah saya jelaskan seperti diatas.


kemudian langkah berikutnya saya membuat curat coret berupa arsiran atau gradasi dengan kecepatan tapi satu arah pertama arah pensil ke kiri terus, kemudian ke kanan terus menerus sampai bawah atas bolak balik, ga tau ya hasil latihan terus menerus arsiran atau gradasi yang saya buat semakin halus dan bisa mengatur tipis tebalnya goresan sehingga epek pencahayaan makin kentara keserasianya. kalau agan bertanya pada saya bagai mana teknik latihan gradsi ya yang saya sarankan sih latihan seperti yang saya jelaskan tadi ,jangan buru buru dulu langsung ke gambar wajah, itu merupakan teknik melatih dan memetangkan kelenturan membuat gradasi, seelah agan mahir membuat arsiran yang halus saya jamin lukisan ataupun gambar sketsa wajah pasti akan menarik untuk anda sendiri, kalau anda  puas pasti yang lainpun akan puas dengan hasil karya agan ! betul ga ya gan ?

latihan yang ketiga kita mulai dengan menggunakan berbagai jenis pinsil dari HB sampai B,B, dan kalau ada pinsil konte yang halus. agan curat coret saja misal pinsil HB ke kiri pinsil B sekian ke kanan dan pinsil konte keatas bawah, kemudian pariasikan jari jari agan meliuk liuk kaya menari hehehe. oke terusnya gan latihan jangan pingin cepat cepat menggambar ke pokoknya, ya hitung hitung pemansan, kaya olah raga saja 060.

oke tip latihan yang ke empat , agan punya photo ? he he..ya punya lah pastinya, gini ya gan buat latihan saya sarankan ga usah pelit pelit buat ngerusak photo cakepmu, lho kenapa mesti dirusak mas ? ya engga lah cuma buat pemula yang lagi belajar menggambar sketsa wajah ,tekniknya begini buat photo anda di bikin garis berkotak kotak pake pinsil, kemudian garis garis berkotak juga kertas manila atau karton atau pun kertas photo yang polos sebagai media gambarnya media, ukuran antara photo dan media gambar pake skala, terserah mau pake skala berapa tergantung besar kecilnya ukuran media gambar. nah antara garis vertikal dan horizontal di beri tanda ,misalkan yang bawah garis garis itu di beri nomor 1 sampai 20 atau berapa pu asal sesuai dengan skalanya, dan media yang pinggir atau horizontalnya beri huruf a sampai z. bila suadah terbentuk metrik selanjutnya tinggal agan buat skets skets nya no 1 di photo harus sama dengan no 1 di media gambar dan huruf a juga harus sama letak garisnya dengan letak di media. bila sudah selesai skets skets nya baru keluarkan jurus jurus yang sudah di latih ketika membuat garis pagar dan latihan lainya yang sudah agan praktekan. dan coba lihat hasilnya…tralala…oke juga ya gambar pertamamu ! oke sampai disini dulu ya sheringnya lain kali saya kasih tips tips yang lainya di tunggu saja, selamat bekerja dan praktek sampai anda mahir menggambar sketsa wajah.


(function(d, s, id) { var js, fjs = d.getElementsByTagName(s)[0]; if (d.getElementById(id)) return; js = d.createElement(s); js.id = id; js.src = “//connect.facebook.net/id_ID/all.js#xfbml=1”; fjs.parentNode.insertBefore(js, fjs); }(document, ‘script’, ‘facebook-jssdk’));

To Draw A Nose Step-By-Step

In this lesson, you’re going to learn how to drawing the nose step-by-step.
You’ll see how to reduce the nose into simple geometric shapes and the fill out the details to make it look life-like.
In this particular lesson, we will be drawing the nose from an angle (3/4 view) so you can see how to draw it from a slightly different perspective.
Here’s the finished drawing so you can reference it:
Finished nose drawing

Finished nose drawing

Join Us now

How To Draw Facial Expressions

Emotions are what breath life to the faces that we draw. Without them, our drawings would be dead and flat.
In order to portray emotions convincingly, we must be familiar with the facial expressions that comprise them.Realistic Portrait course DVD Box Set
How to draw people faces - joy experssionFor decades, the expressions of human emotion has been the subject of study for psychologist Dr. Paul Ekman.
Dr. Ekman has discovered that there are six universal emotions that are common to all humans, regardless of race, gender, or culture. Furthermore, he has spent years decoding these emotions and breaking down their expressions into a series of muscle movements. He reported his findings in his book: Unmasking the Face.

This information is tremendously useful for the artist and in my attempt to learn how to draw the face, I’ve sought out Dr. Ekman’s books.
In this article, I’d like to share with you these six universal expressions and the traits that distinguish them. You can then apply this knowledge to your portrait drawings.
Emotions are typically conveyed through 2 or 3 facial areas such as the eyebrows, eyes, nose, or mouth.
When drawing the different facial expressions, you can control the intensity of the emotion shown by the number of facial areas that are involved. In general, the more areas involved, the more intense the emotion.
For example, if you wanted to show mild anger, you might only express it in the eyebrows while leaving the rest of the face neutral.
You can also blend multiple emotions by mixing the expressions. For example, you can blend anger with sadness by combining the angry brow with the frowning mouth. Certain emotions blend more naturally with others, so keep this in mind.
How to draw people faces - surprise experssion

The 6 Universal Facial Expressions

Surprise: The eyebrows are raised, the eyes are opened wide, and the jaw drops open, parting the lips. The lifting of the eyebrows produces long horizontal wrinkles across the forehead.
The important thing to remember about surprise is that the face is not tense; the upper and lower eyelids are relaxed and the mouth just hangs open without any tension. This will be important in distinguishing surprise from fear.
How to draw people faces - fear experssion
Fear: Similar to surprise, the brows are also lifted in fear. However unlike surprise, with fear, the inner corners of the brows are drawn together. This gives a more straightened appearance to the outer corners of the eyebrows.
In the fear brow there are usually horizontal wrinkles across the forehead, yet they are shorter than the ones shown in surprise. Instead, they are more concentrated in the middle.
Although both fear and surprise have widened eyes and opened mouths, the difference between the two comes down to tension. In fear, the lower eyelids are tensed and raised. While the mouth has tense lips and the corners are drawn back and down.
How to draw people faces - disgust experssion
Disgust: The most important features of disgust are in the mouth and nose. Regarding the mouth, the upper lip is raised, while the lower lip may be raised or lowered.
The nose is wrinkled causing lines to appear on the sides and bridge of the nose. The more intense the disgust, the more these wrinkles will be apparent.
How to draw people faces - anger experssion
Anger: In anger, the eyebrows are drawn down and together. This is not to be confused with fear, where the brow are drawn together and up.
The best way to depict this is to add vertical wrinkles between the eyebrows. Without these wrinkles, the expression just won’t look right.
The eyes will also widen with the lower lid tensing. When this is combined with the lowering brows, it cause the eyes to look as if they are bulging. The nostril will flare. The mouth can either be pressed shut or opened with the teeth showing. In both cases, the lips will be tense.
How to draw people faces - joy experssion
Joy: Joy is expressed though a smile or a laugh. The corners of the mouth are drawn back and up. This pushes the cheeks up and causes the eyes to appear smaller.
One very important feature of the smile is that there will be wrinkles at the corners of the eyes, also known as “crow’s feet”. The absent of these wrinkles are usually a very reliable sign that the smile is not genuine. This tiny detail will go along way to helping you make the drawing more realistic.
How to draw people faces - sad experssion
Sadness: The inner corners of the eyebrows are raised and may be drawn together. The inner corner of the upper eyelid is drawn up, and the lower eyelid may appear raised. The corners of the lips are drawn down, or the lips appear to tremble.
If you combine your understanding of these 6 emotional expressions with a good knowledge of the facial muscles that lies underneath, you will go very far in mastering facial expressions.
If you’d like to learn more about how to draw realistic faces and portraits, be sure to check out my DVD Home Study Course “How To Draw Realistic Portraits
It comes with a no-questions-asked 60-day money back guarantee so you can try everything out without risking a dime.
Click here to learn more about the course!

drawing course that makes the best professional artists

Wow that is something I thought I would never say, but  it’s true. I have always wanted to be an artist and regularly competed in the local drawing completion. But no matter how hard I tried I always ended up coming last.
First Portrait Drawing

Then I discovered your course. Thanks to some simple  tricks you showed me, my life drawings have taken off. So  much so that I actually won the last drawing competition 
and my drawing sold for $560 dollars. This is literally a dream come true. So thank you, thank you, thank you.
Oh there is one more thing I need to mention before I go.  The drawing wasn’t even of a person. I simply applied the techniques you teach in this course, and all my drawings have taken off. Simply put if you want to learn to draw anything, this really is the best course on the market.
I brought your course because I wanted to draw realistic portraits. Every time I tried in the past, my drawing would end up twisted and out of proportion. For years I have walked past artists in the local market wishing I could draw like them. But now thanks to the tips and tricks I picked up in your course, I have my own stall with clients lining up for me to sketch them. I can hardly believe it! 
Second Portrait Drawing
Your course took me from a Guy with a DREAM to Draw, to an Artist who is PAID to Draw But thanks to your course I have completely changed how I layout my drawings and how I progress my work. I have to say these simple changes have made all the difference.
Instead of struggling to capture the image, I find myself sketching with ease. It is like you say, once you discover  the secret, it is like you can finally see what you are  drawing, and the images just comes to life in front of you. 
Life Drawing
Oh, and the quality of my drawings has gone through the roof. I can finally say I know what it is like to be respected and admired for your drawings.
Without a doubt this is the best drawing course on the market. If you want to learn to draw people, you must get  this course.”
Life Drawing
After being told countless times to give up, I finally discovered your course. 
All I can say is this is the best information I have ever seen on drawing real people. Not only do you make things so simple to understand, but the techniques you teach really work!
I have completed several portraits since I purchased your course, and every one of them is a masterpiece. It is amazing that something so simple, as changing how you layout your life drawings can make such a big difference to the final product. 
It is obvious that you are not just an amazing artist, but also you are an amazing teacher. I cannot begin to describe how thankful I am for this information, and what a difference it has made to my art.
Drawing People ExampleDrawing Figure Example
Thanks so much for the support and inspiration you have given me. I have only been drawing for a couple of months now and know I have a long way to go. But this course has clearly shown me the techniques and skills that I need to practice to become the artist I want to be. 


As I have heard you say before, you can never become a better artist without practicing, but this course has shown me how to practise. So take my advice if you are serious about becoming a better artist, then I strongly recommend this course.

Learning to Sketch Faces in Quick Time

When we look at the person who was drawing a sketch of a face , a lot of things you think about . Are these people skills are valued and whether it will be sold. Because face sketches only demand by certain people . Although there are found people who offer such expertise , but real progress is not visible . Perhaps most people consider the price offered is too expensive for a sketch . Or less attractive because only a sketch of a dark -colored . Though you should certainly be able to appreciate the work of people who are experts sketch . The complexity of it will result in higher prices . If you are interested to try it out and wanted to prove to many people that the sketch is also worthy of being on the market then there is a quick way to learn to draw a face you know and learn . Discover the secrets behind a sketch of the face is very interesting for people to know . If your work later recognized , however high the price would be acceptable . So immediately Discover The Secrets To Draw Realistic Pencil Portrait sketch with a 2B pencil of course . Sketch using pencil produces a real portrait of a pencil . Not only attractive color photos that you can choose later , photo pencil sketch would be interesting to select . Do not use ink pen for drawing with pencil portraits certainly not his name . And do not use dye because the face will look natural sketch with pencil only. If you find a sketch of a face with colorful certainly due to the influence of technology development and age . Preferably when will bmenggambar sketches , pencil is more than enough and your pictures will look much more perfect .

If we are interested to immediately draw the eye sketch face the foresight and flexibility it is essential to draw the sketch hands is also very important to have. It is better if the photo you choose is a photo of your face . Because you get to know your face so that when something is missing or strange , you can immediately realize it .
Important parts in Sketch Drawing Faces
Secrets of How to Draw a face on the people started to pay attention to detail eye . There eyeball noticed the object , the object shape of the eyes , slanted eyes or not the object should look. Follow every curve of the eye line of the object with view photos every time you carve your pencil into the field of the white paper . Your eyelashes should also describe the object so that the eyes look alive . The number of lashes you also a good look . Do not exaggerate if the object eyelashes just thin . The distance between the two eyes should also be appropriate to use help lines then you can make two right eye . Make sure the position of the two eyes do not align there are too up or down . Continues to learn to sketch your face is drawing the eyebrow . Thick and thin eyebrows should be the same as in the photo of the object . Use shading to draw eyebrows face . The shape of the eyelid also sometimes appear to be aware of the photo if there is visible eyelid . So also with eye bags everyone is different . If it looks then you should come up with a size that corresponds to reality in a photograph . After you draw a sketch eyebrows nose . The curve of the nose is certainly a bit more than the eye . You must be careful when drawing . The size of each person ‘s nose is no big and some are small as well as nostrils . The placement of the nose should be right between the eyes of the object . Then set the distance to the mouth and nose when it’s right , you can begin to draw lips . Lip size is also different for each person so you should be able to adjust the size of the object so that the right lip middle .
Need Help Adding lines and hatching
To help lines mentioned above you can make with the help of a ruler . You measure distance to scale a photo . Of scale images with different areas of your drawing paper so it needs to scale . Draw lines on the mahidung aids , lip , eyebrows , chin , forehead . Certainly forehead to forehead mennetukan how big the object . Leaving the help lines towards hatching , shading only for the eyebrows and hair . Possible shading is also used on the cheeks or the other , but the only two sections of the main . Appropriate shading art methods do you accept and learn first. Start shading into thin long until thickened on the part that is desired.
Need a healthy eye and keen in making sketches . If your eye is in trouble or is using the glasses then make sure you can be helped with the viewing aids . However, the origin of the light in the room you’re working light then is not a problem . talk menegnai Cahay , it is better if you choose to draw as open space landscapes tetnu be more inspiring and calming your mind . You become the focus in the drawing . In addition, wind is blowing will make you comfortable . Practice in an open space where possible and as often as possible . Because the harder you will learn How to Sketch People increasingly mastered by following the steps and rules that have been mentioned . The more flexible movement of your arms , the faster the results of your facial sketch image . It would be much too job-job flow to you . You could also hold a group exhibition of sketches with existing sketches to introduce your work with friends

Discover The Secrets Of Drawing Realistic Pencil Portraits

Natural landscapes , flowers , fruits , animals , abstracts often found in the wall decorations in the house . But for people like sketch face painting , certainly still rarely found . Only those who obtain indeed a gift or make a sketch of the wall decoration in the house so there is a sketch of the face . Talking about it really until now less popular . The beauty of color to trigger people prefer to print pictures than sketches . And if you know , people who are experts draw a face it will be paid handsomely for that capability is rarely owned by others . You are interested in facial images then you must know the Secrets of How to Draw a sketch of the face . Is it really as difficult as a result or even easily find the answer you need . You also need to Discover the Secrets of Drawing Realistic Pencil Portrait that you know to complete . The sophistication of Internet technology should be utilized to search through blogs that are discussing or sketches can also learn through books learning sketching . Many ways that you can take to uncover the secrets of painting faces .

It is important to be an expert to draw a sketch then you should be happy to draw . Expertise art also must have though it was just a little bit . Because the sketch drawing is closely related to the proportion , perspective , dimension is used , shading method , and other art . You will not be able to draw only if you’ve never done . When you ‘ve planned to learn then choose a location in the open space such as parks , public places are deserted , or in the field with an atmosphere that makes you comfortable . If you are not happy in the open space in the house so when using bright lights . Existence of the number of windows is very important so you should have a special space for drawing sketches .
Observing Object Sketch Your Photo
You can begin to observe the faces of the object can be directly or with photographs, early sketches Ways People find . Observe carefully and make sure the object you are quiet because it is more convenient object and produce good work if the object does not move much . Make sure the first when selecting an object like- people are living at home sitting quietly in a long time . However it is better if you use a photo just by putting on a pedestal trplek your pictures and clips with paperclips . It helps you in learning more than those that will surely move in unexpected ways.
Drawing the Right Preparation Tools
The next step use a 2B pencil that has a bold color and large firm produces scratches than HB pencil . Do not forget to use the tip of a sharp pencil aka blunt . Likewise eraser that you use should be clean and will not leave marks when you use black . If you make a dirty erasers will make your sketch unfavorable outcome . For example, the cheeks are supposed to be clean but must look dirty due to remove the eraser that is not clean . Make sure the paper size is also great at least A3 in order to more freely move your hand at a wide area . Or use paper that you cut yourself manila can be done if the size is not big enough for your A3 .
Stages Starting Sketch Faces
Towards to the face would you sketch a picture , then noticed the grooves face photographed object . The lines of the face is clearly visible or not , if there is a curve of the note with the details . You should not draw with different results for a facial sketch . This is tantamount to lying because you are not directly change the shape of the face of the object . Learn the secrets sketch slowly and structured so that your hands are not too stiff . How to quickly learn to draw face sketch is crucial is thin like a hatch first . Certainly will often delete when they entered the early stages of learning . When you ‘ve managed to draw the face of a new fully affirmed the lines you create . Note that the special for the hair and skin color shading use only. Do lines thick or thin as it will make your results look less good sketch . In starting to draw a face with eyes, eyebrows , nose , lips . Forehead , cheeks , and chin can adjust the final part because existing fields . Because for the eyes , eyebrows , nose , and lips are almost adjacent sections that should be drawn first so that there is proper spacing . If you start by drawing the shape of the face eg oval, round , or oval , when you draw too small or too large field that you picture then you will have difficulty regulating the distance .
In order for the sketch you made more evident then when entering the final stages of re- photograph the object of attention . Is there are less or not as the grooves on the face and so forth . The reason the light would be useful in this regard , which can help you see the detail of the image that you created . If the results of your initial sketch is not perfect then do not give up . Repeat again until you are truly an expert and only takes a quick sketch when drawing faces. You also managed to uncover the secrets of the difficulty of drawing sketches of the faces of people . Later you can use the expertise of these sketches to give a gift to your friend or relative ‘s birthday .

Belajar Membuat Sketsa Dan Melukis Orang

Menggambar merupakan salah satu kesenian yang menjadi daya tarik tersendiri bagi orang yang menyukai dan hobby. Hal tersebut karena bagi sebagian orang menvisualisaikan imajinasinya merupakan suatu kegiatan yang menyenangkan untuk mengisi waktu luang karena dengan membuat gambar nantinya seninya akan mengalir dan juga tergambarkan dalam gambar tersebut. Banyak juga orang yang berminat untuk belajar menggambar. Sekarang ini yang sedang banyak diminati oleh orang adalah melukis sketsa wajah orang karena dinilai lebih menarik. Tetapi dalam membuat sketsa tentu saja harus belajar membuat sketsa terlebih dahulu untuk pemula karena memang melukis sketsa orang tidak mudah dan perlu belajar. Sekarang ini untuk bisa menggambar sketsa seseorang banyak sekali yang bisa dilakukan untuk para pemula. Untuk belajar melukis wajah juga bisa mencari informasinya di internet dengan browsing atau dengan membaca buku. Tetapi semakin berkembangnya zaman sekarang ini jika anda ingin belajar menggambar sketsa, maka banyak sekali informasi yang bisa anda dapatkan dari internet seperti cara sketsa orangrahasia bagaimana menggambar dan yang lainnya. Dengan mencari informasi tentang cara cepat menggambar wajah seseorang di internet maka akan sangat mudah bagi anda untuk belajar. Tetapi di dalam menggambar sketsa seseorang dibuthkan keahlian dan juga imajinasi serta kemauan untuk belajar sehingga nantinya bisa menguasai bagaimana teknik – tekniknya. Selain itu juga dalam menggambar sketsa orang membutuhkan ketelitian karena harus memperhatikan semua detail – detail dari seseorang. Oleh karena itu jika anda memang berminat untuk menggambar sketsa seseorang maka temukan rahasia menggambar potret pensil realistis. Jika anda sudah menguasai bagaimana teknik – tekniknya, tentu saja anda akan lebih mudah dan juga lebih bagus dalam menggambarnya serta memberikan hasil yang lebih maksimal. Dengan demikian nantinya anda bisa memanfaatkan keahlian anda dalam menggambar orang sebagai ladang bisnis atau apa saja.

Untuk bisa membuat gambar orang, maka dibutuhkan pembelajaran cara menggambar sketsa terlebih dahulu mulai dari wajah hingga badan dengan demikian nantinya bisa menggambar dengan baik. Adapun beberapa hal yang perlu anda perhatikan dan lakukan adalah pembelajaran membuat gambar sketsa orang seperti berikut ini:

1.             Belajar membuat sketsa
Dalam membuat sketsa dibutuhkan pembelajaran terlebih dahulu oleh karena itu anda bisa belajar menggambar sketsa dengan mencari informasi di internet atau buku – buku dan juga mengikuti kelas kursus menggambar dengan demikian anda akan lebih jelas dan juga paham dan bisa belajar menggambar dengan baik.

2.             Cara sketsa orang
Untuk belajar menggambar sketsa orang, anda juga harus tahu bagaimana teknik – tekniknya menggambar sketsa orang mulai dari wajah sampai dengan badannya.

3.             Rahasia bagaimana cara menggambar
Tips – tips menggambar sketsa memang biasanya jarang dipublikasikan oleh karena itu jika anda ingin menjadi seorang pelukis orang secara professional maka sebaiknya anda mengikuti kursus menggambar dan melukis sehingga bisa mendapatkan tips – tips tersebut.

4.             Cara cepat menggambar wajah
Untuk bisa menggambar wajah anda perlu menyiapkan beberapa peralatan menggambar, dan untuk belajar anda sebaiknya menggunakan gambar / foto terlebih dahulu karena dengan menggunakan foto tentu saja objeknya tidak bergerak dan hal tersebut akan lebih memudahkan anda dalam belajar menggambar.

Cara ini yang agak sulit karena harus menemukan teknik bagaimana melukis potret pensil yang realistis. Tetapi cara ini anda bisa menemukannya dengan mencari informasi di buku – buku teknik melukis dan juga pada dasarnya anda harus bisa menemukan kenyamanan dalam anda melukis. Anda bisa belajar untuk menyalinnya dari media foto dengan beberapa garis bantu. Hal tersebut karena semakin anda sering berlatih tentu saja keahlian nantinya bisa berkembang dan semakin bagus.

Jadi dalam melukis orang, pertama yang harus anda lakukan adalah mencari informasi bagaimana cara sketsa orang serta belajar membuat sketsa wajah terlebih dahulu kemudian belajar sampai dengan badannya. Kemudian persiapkan peralatan untuk melukis yaitu pensil, kertas, penghapus dan yang lainnya. Untuk cara cepat menggambar wajah anda sebaiknya menggunakan media foto terlebih dahulu agar lebih mudah, hal tersebut karena dengan menggunakan objek foto tentu saja objek yang akan anda gambar tidak bergerak selain itu anda juga bisa menggunakan garis bantu terlebih dahulu agar bisa lebih mudah dan pas dalam letak gambarnya. Tetapi rahasia bagaimana cara menggambar sketsa orang, anda harus memperhatikan detail – detail dari bagian wajah dan yang lainnya dengan teliti sehingga nantinya akan lebih pas. 

Kemudian temukan rahasia menggambar potret pensil realistis di buku – buku panduan menggambar dan juga yang lainnya, selain itu anda juga bisa menggunakan garis bantu dengan mencoret – coret pada foto tersebut pada bagian tertentu seperti agar mata simetris dan juga sesuai dengan foto, maka anda bisa memeberikan garis kotak – kotak pada foto dan juga kertas gambar anda dengan demikian letak dari mata, hidung dan bagian lainnya bisa sejajar serta pas tidak miring dan hasilnya lebih maksimal. Mungkin untuk pelukis pemula memang kurang bagus hasilnya tetapi pada dasarnya menjadi seorang pelukis professional harus mempunyai kemauan yang keras dan mau belajar serta berusaha dan juga berlatih dengan sering berlatih melukis maka nantinya akan bisa mendapatkan hasil gambar yang bagus seiring berjalannya waktu. Karena menjadi seorang pelukis memang tidak semudah itu perlu adanya ketelatenan, ketelitian dan juga kemauan untuk belajar dengan ekstra. (function(i,s,o,g,r,a,m){i[‘GoogleAnalyticsObject’]=r;i[r]=i[r]||function(){ (i[r].q=i[r].q||[]).push(arguments)},i[r].l=1*new Date();a=s.createElement(o), m=s.getElementsByTagName(o)[0];a.async=1;a.src=g;m.parentNode.insertBefore(a,m) })(window,document,’script’,’//www.google-analytics.com/analytics.js’,’ga’); ga(‘create’, ‘UA-44811376-1’, ‘belajarmenggambarsketsawajah.blogspot.com’); ga(‘send’, ‘pageview’);